Hello everyone and welcome to my premier blog post. Today’s post includes some of the Easter/Spring cards I created last week and instructions for a fun split easel card.


Extended family and friends gathered at my parent’s house this weekend for dessert and games Easter evening. Several of us craft, so It’s becoming a tradition that we exchange cards. Mom recently discovered watercoloring with stamps, here’s the lovely card she gave me. I think she did an excellent job, don’t you?

Ok, so on to the instructions for the split easel card.


Supplies
Paper
12 X 12 cardstock – 1 piece
Complementary or accent papers – 2 different pieces (approx 3.5 X 6.5 in each)
White cardstock – 1 piece

Paper trimmer or scissors and ruler
Stampendous Easter Bonnet Baby Stamps
Copic Markers or Colored Pencils (your choice)
Yellow Flock
Iridescent Glitter
Scrap Happy glue
Glossy Accents
Pop dots
Tuxedo Black Memento stamp pad
Pearlescent Sky Blue Brilliance stamp pad
1 Rhinestone embellishment (from Michaels)
1 pk Flowers (from Michaels Impulse bins)
1 pk Pearl embellishments
Ribbon (approx 7 inches)
1 small feather
Let’s get started!
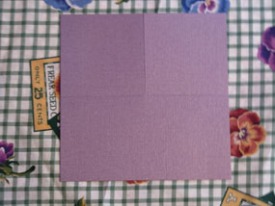
- Cut a 6.5 X 6.5 inch square from the cardstock
- Score the square, horizontally, across the center at 3.25 inches (splitting the card in two equal parts)
- Split the top half of the card in half equally.
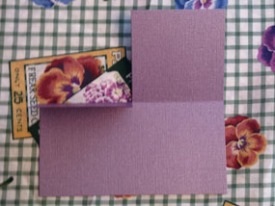
- Find the center of the card (3.25 inches)
- Cut down to the center score mark (3.25 inches)
- Score the two newly created pieces diagonally, so the folds end in the center of the card. (score the left side from the upper left corner to the center of the card and score the right side from the upper right edge to the center of the card)
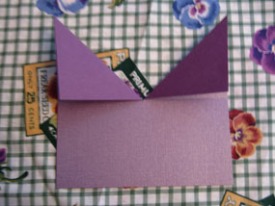


You have now completed the base of the card! A few more cuts and you’ll be ready to decorate
- From the remaining cardstock cut two 3.25 X 3.25 in pieces
- Trim one of the accent papers into two 3 X 3 in pieces. This will eventually be applied to the cardstock. You will have a small .125 in frame around each piece
- Trim the other accent paper to 3 in by 6.25 in. Center this piece on the lower (uncut) portion of the card.

Now the serious fun begins
- Chicks
- Stamp the two of the smaller chicks using the Tuxedo Black stamp pad
- Color the hat, beaks and feet using your Copic markers or colored pencils
- Flock the chicks. Lightly coat the body with the Scrap Happy glue, sprinkle the flock on the chick, press the flock firmly onto the paper before knocking off the excess.
- After the flock has dried, accent the flowers with glitter and apply a small drop of Glossy Accents to each eye.
- Add a feather to the hat of the smallest chick
- Fussy cut around each chick
- Top of card
- Lightly ink distress the edges of the three accent papers
- Attach a piece of ribbon to the bottom third of each of the two 3 X 3 pieces of accent paper
- Trim the smaller flourish from the rhinestone embellishment and apply to the right side of the card. Apply the remaining piece to the left side of the card
- Apply flowers to the card with the Scrap Happy Glue
- Add the chicks to each side of the card using the pop dots
- Mount each of the completed pieces to a piece of the 3.25 X 3.25 inch cardstock
- Attach the these pieces to the card base. This is important – glue only the lower triangle of each flap. Leave the upper portion of each piece unglued, this will allow the card to twist and stand.


- Bottom of Card
- Apply the 6.25 X 3 in piece of accent paper to the bottom half of the card
- Adhere a pearl embellishment to each corner of the card, creating a “doorstop” to hold the easels in place. I have my card to open so the easels line up to the point corners of the bottom of the card.
- Stamp “Happy Spring” onto white cardstock and fussy cut around it
- Mount this onto the remaining cardstock and fussy cut around this, leaving a small (approx .125 in) boarder
- Accent with glitter as desired
- Center the greeting on the bottom of the card


Congratulations, you have now completed your double twisted easel card!
